Venturing into Large Format (Part 4)
In this final part of my report on my first large format photography adventure with the Tachihara 4×5 camera, I will present some of my first images taken – acceptable images but also some obvious failures. The images are rather technical and had the mere purpose to get friends with the camera and the lenses. Hence, please do not expect fine art here! On the last 3 weekends I went to the following places for shooting:
- Schloss Neuhaus, a renaissance palace in Germany near Paderborn – and the nearby Wewelsburg, a castle with triangular layout.
- The city of Gera in Germany and nearby castles and small villages.
- Dornburg castle and palaces, a group of castles/palaces situated right at a steep limestone cliff above the Saale-valley.
I chose these places as they are easily accessible and offer some scenes with landscape and architecture to play with.
The choice of film:
For a start, I tried 3 different types of 4×5 sheet film:
- Adox Ortho 25: an orthochromatic film at ISO 25. This kind of film is much less sensitive to red light than panchromatic film. It has a very fine grain and easily gets over-contrasty – depending on the type of developer and dilution.
- Adox CHS 50: a panchromatic film (ISO 50) based on an emulsion from the 1950s. This film appears to give very smooth gradients.
- Ilford FP4+ 125: another classic panchromatic emulsion.
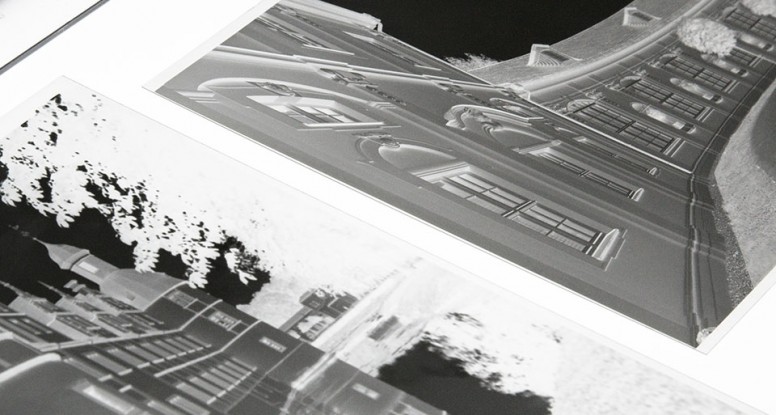
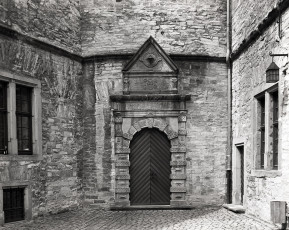
Below you can see a comparison of (a) the Ilford FP4+ with (b) the Adox Ortho 25. Both are exposed in a similar way and the same developer/dilution was used. The difference in contrast is obvious. The difference in colour sensitivity, however, is not that apparent, as the scene was nearly free of red.
 Ilford FP4+ developed in ID-11 1+3")
 Adox Ortho 25 developed in ID-11 1+3")
Resolution and depth of field:
To give you an idea of the shallow depth of field in 4×5, below you can see enlarged details of the last image shown above, which was taken with the Symmar 150/5.6 lens at an aperture of f/16: (a) the little plate on the door in the centre. This plate was more or less exactly in focus. (b) part of the column to the left of the door, which was just slightly in front of the plane of focus. As you can see, the difference in sharpness is already apparent.
 detail in the plane of focus (f/16)")
 detail off the plane of focus (f/16)")
Some failures:
Of course, as this is the real world, the first times out with a new camera will also result in a fair amount of technical failures! I decided to show you some of the worst I made, so you can laugh or learn from it! But the greatest value is probably for those who just started with large format photography: These failures of mine might help overcome your frustration when you see that failure is normal and part of the learning process.
Below you can see
(a) a magnification showing pieces of lint which apparently were on the film when exposing. Additionally there are the traces of little air bubbles which apparently stuck to the film during development. I suspect the lint to come from my changing bag which I used to insert the film into the holder.
(b) an example where I accidentally pulled the dark slide of the film holder half-open when the holder with the exposed film was in the camera bag.
(c) I mistakenly opened the sheet film holder when the shutter was still open from the focussing procedure.
(d) here you see a light leak on the bottom left of the image. This probably happened when I pulled out the dark slide after I inserted the film holder into the spring back of the camera. If this is not done carefully, one might lift part of the spring back and open a gap which lets in a fair amount of light.
(e) similar to (d) but less pronounced.
(f) accidental double exposure! Do not ask me how this could happen.
 lint and bubbles")
 dark slide pulled half open in camera bag")
 dark slide pulled open with open shutter")
 light leak bottom left")
 light leak bottom left")
 double exposure")
The only thing which still bothers me is the occasional bit of lint on the negatives, especially since I usually have to refill the film holders while travelling – sometimes not really in the cleanest environments. I ordered a changing tent and hope this might improve the situation here.
Further articles, such as on how to develop 4×5 sheet film and how to measure the exact shutter speeds of mechanical shutters will follow later.


Thank you for this very informative article that you too the time to write. Your pictures look stunning, regardless of the few mishaps you had along the way.
Thanks
I enjoyed reading about the faults as much as the successes. Thank you for being for honest! I am about to embark on 8×10 photography so your advice will be very useful.
Thank you Roger! Yes, a lot may happen when you start with large format photography. But even the faults are exciting in a way 🙂
Good luck with your 8×10 adventures!
Hi Alex
I Really enjoyed this read, as it was a great laugh and learn.
I was wondering if you have some more photos or even some video of the camre partially assembled/folded.
I realise that you are unlikely to still read these comments, but if you happen to, i sincerely hope that you will respond.
Thank you
Joe
Sorry, yes, this site has not been updated with new content for quite a whil now and so I did not read any comments recently. There are certainly images somewhere on a hard drive. But I am in the middle of moving so most things are packed away already …