How to develop black and white film
This is a short report of how I develop black and white film. I can only encourage everyone to just try it at home, since it is not very complicated. And it is really fun!
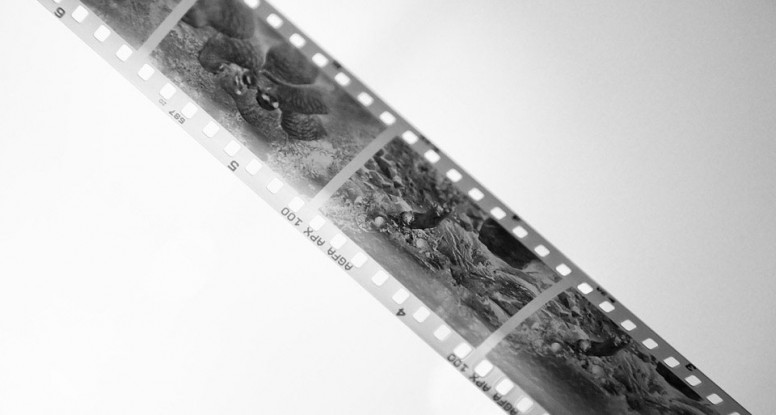
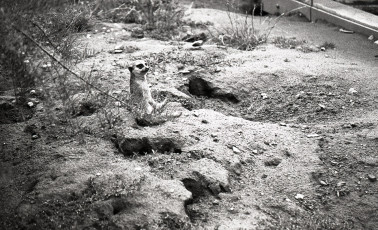
Recently I found some old roll of 35mm Agfapan APX 100 black and white film, expired since 10 years ago. I did not know how the film was stored, except that the last 5 years it was not in the freezer but in a box in one of my cupboards. As I was curious if it was still usable, I went to the Zoo, exposed the roll and started developing it using a package of 20 years old Ilford ID-11. In the gallery above you can see some of the images as scanned with an Epson V700 scanner. Not a bad result if you consider that here a film roll from the last century met developing chemistry from the last century. But now for the actual process of developing the film:
The equipment needed:
There are several ways to develop black and white film, but the most convenient and cheapest for roll film is certainly in a cylindrical development tank. I personally use a Paterson Super System 4 development tank, but there are other brands around with similar products. Unlike for colour processing, for black and white film, temperature control and exact timings are less critical. Don’t get me wrong, different temperatures and timings will influence the outcome of the process also for black and white, but deviations will not completely ruin the negatives as it can happen in colour processes. Hence a thermostat or an automated processor are not really needed.
The minimum equipment needed is illustrated in the three images below:


- A development tank with a light-tight lid. I use a Paterson 3 reel tank which can take up to 3 rolls of 135 (35 mm) roll film simultaneously or two rolls of 120 roll film. And of course you need at least one film reel compatible with the tank system you use.
- For mixing and storing the development chemistry, you will need some measures, something to stir, at least one funnel and at least three empty containers to store the working solutions of the developer, the stop bath and the fixer.
- Last but not least you will need several smaller items: ideally an opener for film cartridges, as this makes opening in the dark so much easier, a pair of scissors to cut the film, a thermometer for temperature control, a stop watch, and film clips for the drying of the film afterwards.
Of course some things can be improvised. Optionally you might further need a larger container to take the chemistry containers and fill it with water of defined temperature (if temperature control is an issue on a very hot or cold day). And if you do not have access to a dark room and cannot get your bathroom light-tight, then a film changing bag can serve as a miniature dark room.
Preparing the chemistry:
Developers for classic black and white film come in various varieties. Some you get as a liquid concentrate which you have to dilute, others come as a dry powder which you have to dissolve to produce your stock solution. Also some, such as the legendary Rodinal, survive for ages on the shelf, while others will degrade (oxidise) over time and even might die a sudden death when you least expect it and ruin your film. For the more advanced there are also 2-step developers, which consist of two different solutions applied subsequently.
Choosing the ideal developer / film combination – and all the other parameters such as exposure of the film, dilution of the developer, development time, temperature, agitation during the process – can be a very long process, and very much depends on what you want to achieve and on personal taste. Different combinations will result in differently pronounced film grain, different “sharpness” and contrast and tonality. These issues are discussed all over the world wide web, sometimes controversially, and I will not go into details. Probably everyone has to find his or her own path by experimentation.
So what are the chemicals we need?
- A black and white developer. In this illustration I use a package of Ilford ID-11 – a well known standard black and white developer. It comes as two different powders which have to be dissolved according to the instructions on the package. From this so-called stock solution one can further dilute with water to produce a one-use working solution.
- An acid stop bath, which once in contact with the film will immediately stop the effect of the alkaline developer. I personally use a stop bath with an indicator: a colour change will indicate once the stop bath has lost its acidity from too much use and has to be replaced.
- A fixer. I use Ilford Rapid Fixer. The fixer will remove the remaining silver halide salt from the film emulsion and make the image permanent. After this step, further exposure of the film to light will have no effect. Fixers usually come as concentrated liquids which have to be diluted with water according to the instructions.
- A wetting agent for easier drying of the developed film and to avoid drying stains. No preperations are needed here, a few drops of the wetting agent will be simply added to the water after the last washing of the film.
The three images below show (from left to right) a) the four main chemicals applied, b) the diluting of the developer stock solution and c) the diluting of the yellow indicator stop bath:


The amount of developer solution needed per film reel depends on the tank system you use, for the Paterson shown here, 290 ml are needed to ensure one reel of 35 mm film to be fully submerged. Furthermore you have to be aware, that for some developers a minimum amount developer per film is specified. In the case of Ilford ID-11 this would be the euqivalent of 100 ml stock solution per 35 mm film with 36 frames. With a dilution of 1 + 3, this equals to 400 ml of working solution, substantially more than the 290 ml specified as the tank minimum!
For the stop bath and the fixer, 290 ml would do, but as they both can be reused many times I do not bother preparing such small quantities and go for a litre each straight away.
Instead of the stop bath, watering the film to wash away the developer will also do, but will give less precise timings – in particular bad if you work with short developing times. If you want to save money, you can also produce your own stop bath by diluting e.g. citric acid or similar.
When preparing the chemistry, you must make sure to always use clean measures, funnels and canisters, free of residues of the developing chemistry or detergents. If you accidentally get stop bath or fixer into the developer, this will likely ruin your development process. Also it is highly advisable to properly label all the containers in order to avoid a mix-up.
Transfering the film into the development tank:
Now, with all the chemistry prepared, it is time to transfer the film from the film cartridge into the development tank. Everything described in this paragraph has to be done in absolute darkness, in a tightly sealed dark room or in a film changing bag! The images below are shown under illumination for illustration purposes only! The tiniest bit of stray light will expose the film and ruin it. Also make sure no one accidentally opens the door of the dark room to tell you dinner is ready.
It is best to sacrifice one or two rolls of film to first train the process under illumination where you can see what you do, before you turn to the real thing in total darkness.
First you need to open the film cartridge. This is ideally done with a special opener. If you are very talented you might be able to do this with a knife or other tools, but do not blame me if upon trying this you damage your film, cut your fingers or punch a hole into your film changing bag. You have been warned.
Once one of the lids is removed, you can pull out the film roll. At this stage the emulsion side of the film is pointing to the inside of the roll. Ideally you will not touch this side.
Once the roll is pulled out, you should cut away the first tapered bit of the film strip, the leader, as this will make it easier to spool the film onto the film reel:


Now you can breathe again as this was actually the hardest part!
In the case of the Paterson tank, you now place the reel onto the central column of the tank system and then place it into the tank. Then the tank is sealed light-tight by inserting the integrated funnel on top and twisting it until it clicks. Now you can switch on the light back on!
The remaining small plastic tube can later be inserted into the funnel for rotating agitation during the development process. Furthermore the tank can be sealed totally by using the cap.


Developing the film:
With everything prepared now, the development process can begin. As mentioned a few paragraphs earlier, dilution, temperatures, timings and all other parameters will influence the outcome of the process. And everyone should experiment and find his personally preferred process. However, for a start, there are guidelines available. Be it in books, in the developer and film instructions or in the world wide web. A very good resource to start with, if your film / developer combination is not covered by the instruction of either of the two, is the online B&W Film Development Database.
For APX 100 film exposed for ISO 100 with Ilford ID-11 diluted 1+1, this database gives 13.5 minutes development time at a temperature of 20°C. As I diluted 1+3, I extrapolate the time to 22 minutes as a rough guess. Also I realised room temperature was closer to 21°C so I decide for 21 minutes. This will not make a huge difference though. As I said, you best experiment with all this for yourself.
So the development process applied looks as follows:
- It starts with the developer: Pour it into the tank and agitate every first ten seconds of each minute using the rotational agitator of the Paterson tank. This rhythm follows the Ilford advice. One could also agitate by slowly inverting the tank upside down and back again – with the cap tightly closed of course.
After each agitation the tank is set firmly onto the table, with a “knock”, to shake off tiny air bubbles from the film’s emulsion.
Shortly before the 21 minutes end, I start emptying the tank by pouring out the developer. Best you collect it as liquid waste and dispose it properly. - The stop bath: Pour it into the tank, shortly agitate and leave it for 10 seconds.
Pour it back into the container (using a funnel). - The fixer: Pour it into the tank, agitate, and leave it for 4 minutes.
Pour it back into the container (using a funnel). Now you could open the tank since the film is fully developed. - Watering/washing: My washing procedure also follows the Ilford advice: Fill the tank with water, invert five times (or agitate by other means), drain the water away, do the same again with 10 times inversion and then again with 20 times inversion. This procedure uses substantially less water than just rinsing the film with water for many minutes.
By the washing the residual chemical agents are removed. This is important to ensure a long life of the developed film without degradation. - Now the film can be removed from the reel. Most reels can be taken apart into two parts by a twist, so you can easily remove the film from the reel without the risk of mechanical damage to the emulsion. Do not touch the emulsion side as it is soaked with water and very sensitive at this stage.
- Final watering with the wetting agent: For the final watering, I add a few drops of the wetting agent to the water. This allows the surface water to easily drop off after the film and avoids drying stains later on. Ideally in this step deionized or distilled water is used to be 100% sure.
Alternatively you could use a special film squeegee to get rid of the water on the film surface, but this always bears the risk of mechanical damage to the emulsion. - Drying: In the last step, the film clips are attached to the two film ends and the film can be hung up for drying – best in a dust free area. Usually one of the two clips is heavier. This one serves as a weight to pull the film strip straight. I avoid drying with a hair dryer since this often blows a lot of dust onto the emulsion, which will be hard to remove later.


Conclusion:
Even long time expired film and developer of dubious origin are worth to give it a try as they can might still yield acceptable results. In this case of my APX 100 which has probably never seen a freezer, in the end the film grain seemed a bit over the limit. But this could also partially stem from poor temperature control on this hot day and I was probably beyond the 21°C measured in the very beginning when I prepared the chemicals.


What if you open the can were the film is in and you can’t see the pictures doesn’t it mean you never tool pictures or something is wrong with the film?
Not sure what you mean. When you open it, you hopefully cannot see a thing as it is dark. Else you will of course spoil the images.
If you went through developing and cannot see a thing, does it mean the negatives are fully transparent? or dark? If they are dark, they are most likely utterly overexposed or the film had seen a lot of unwanted light. If it is an old camera, maybe it is not lightproof?
If they are fully transparent, then the film might be very underexposed or not exposed at all. Could be a shutter problem.
Of course you can also achieve both effects if you chose the wrong concentrations, times, and sometimes temperatures in the developing process.