Venturing into Large Format (Part 2)
Since I started my large format photography adventure a couple of weeks ago with the purchase of the Tachihara 4×5 field camera, I spent a lot of time hunting for second hand equipment, such as sheet film holders, wire releases, some lab parts, and of course lenses. The lens question is really a tough one, since a large variety of lenses has been produced by various companies over the last 100 years.
 First of all one has to decide for a specific focal length. Here you have to keep in mind, that the visual effect you achieve when composing the images is not really depending on the focal length of the lens, but on the angle of view of your system consisting of the lens and of the recording medium, be it film emulsion or sensor. The combination of focal length and the dimension or format of the film or sensor define the angle of view: The larger the format for a given focal length, the wider the angle of view. The longer the focal length, the smaller the angle of view. The Schematic image to the right gives an impression what the difference in format really means if you compare the area covered by the 35 mm format (24 mm x 36 mm) with that covered by the 4 inch x 5 inch format. In today’s digital world, 35 mm is often referred to as “full frame”. This “full frame” looks already rather small compared to 4×5, the smallest of all large formats.
Besides on the angle of view, in practice the much larger format will also have a pronounced effect on depth of field. For a given f-number the depth of field will be considerably smaller for the larger format.
Inspired by my photographic habits in the smaller formats, I decided for a “normal” lens of 150 mm and a wider lens of 75 mm. These very roughly correspond to focal lengths of 50 mm and 25 mm on 35 mm full frame.
Of course the focal length is not the only parameter important for a lens, one should not forget about
- the image circle: shift and tilt movements of the lens will require an image circle that is actually larger than the dimensions of the format.
- the glass coating: very old lenses are often uncoated, giving heavy internal reflections that can lead to ghosting and in any case reduce the amount of light reaching the film. In later years lenses were single-coated, and today even multi-coated.
- the aperture range and the range of shutter speeds and – in particular if buying second hand – the deviations of the mechanical shutter from the nominal values.
The Schneider-Kreuznach Symmar 5,6/150 convertible lens:
 As my plan was to start with two lenses only in the beginning – one short focal length (“wide angle” in small format terminology) and one “normal” lens – I thought a so-called convertible lens would be a good idea for the normal lens. Convertible lenses can be converted to a longer focal length by removal of either the front or rear lens cell. Of course, since the various optical aberrations are only compensated in a well balanced set up of both lens cells, removal of one of the elements will result in reduced image quality. Actually some convertibles at the longer focal length only give half way decent results when used on black&white film in combination with a colour filter (e.g. yellow) to suppress chromatic aberration.
Nevertheless I wanted to give it a serious try and decided for the Symmar 5,6/150 convertible lens, produced in Germany by Schneider-Kreuznach since the 1920s. When you remove the front cell from this lens, the focal length is extended from 150 mm to 265 mm, and the maximum aperture is reduced from f/5.6 to f/12.
The specimen I managed to find is equipped with a German Synchro Compur shutter and was built in 1961. By the way, you can identify the age of a Schneider-Kreuznach lens by its serial number on their webpage: Schneider-Kreuznach Serial Numbers. The image above shows the lens with the front and rear lens cap in place. It looks a bit beaten with several pronounced scratches on the metal parts, but the glass looks fine. This lens has certainly seen some heavy use over the last 50 years!
But now for some more details. Large format lenses often consist of three parts, usually screwed together: the rear lens cell, the front lens cell, and in between the shutter element which contains the shutter and the aperture. The image below shows the three parts disassembled:

When you unscrew the lens elements as shown, be careful not to damage the thin shutter leaves or the aperture diaphragm. It is actually best to keep all fingers and tools as far away from these delicate parts as possible. Else you might easily regret it later.
Below from left to right you can see the lens with a) the shutter open and the aperture fully open at f/5.6, b) the aperture at f/16 and c) the shutter closed:
")
")

Mounting the lens on a lensboard:
Before the lens can be used with the camera, it has to be mounted on a lensboard compatible with the camera. The Tachihara takes lensboards of the Linhof-Technika type, and I was able to get a second hand original Linhof board (see images below).
The diameter of the shutter element of the lens has to fit the hole in the lensboard. Diameters are usually specified by numbers: Copal #0, #1, #2, … (Copal is a Japanese company producing shutters). The lensboard shown has a hole for Copal #1, which corresponds to 41.6 mm, exactly what is needed for my Symmar lens. As can be seen, the hole is not fully centrical, but shifted downwards on the board a bit. Later this has to be taken into account when the bellows of the camera is positioned. The protruding ring on the board’s rear side serves as a light-trap when fitted into the camera’s front standard.
The tiny hole which you can clearly see on rear and the front of the board was drilled to attach a Linhof-Rapid wire release adapter. However, this adapter is missing on the board so the screw hole has to be sealed light-proof before taking any images with the camera. Else this hole would project a second (ghost) image onto the film – just like the pinhole of a pinhole camera.

")


To tighten further, one might use a special tool like a lens wrench, or – if applied very carefully – a pair of pliers.
The next three images show how the Linhof Technika lensboard is mounted on the Tachihara, the protruding ring on the lensboard’s rear side fits tightly into the round hole of the Tachihara front standard:
")
")

On the last image you can see the mounted wire release to the left of the lens. The wire release is simply screwed into the thread right next to the shutter release of the lens.
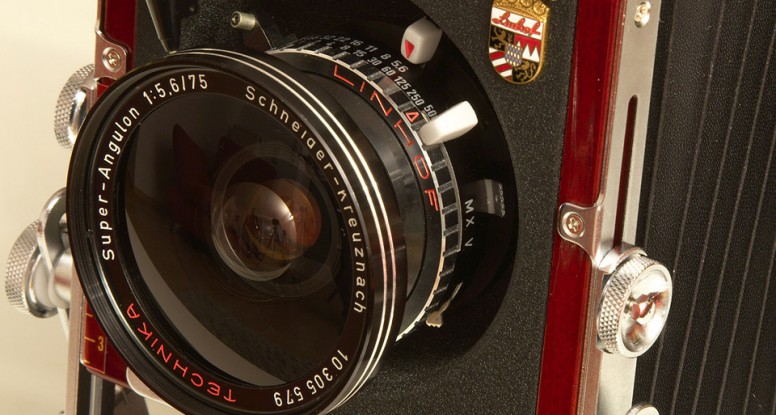
The Schneider-Kreuznach Super-Angulon 5,6/75:
This lens has a rather short focal length, which is in the range of the minimum bellows extension of the Tachihara 4×5. Hence it is advisable to mount it on a recessed lensboard to allow for easy camera movements. Compared to a standard flat lensboard, the bellows has to be compressed by far less as the lens is mounted recessed towards the image plane of the camera (see image below).
Luckily I was able to get the lens as a Linhof Technika version from 1967, already mounted on a lensboard, with a Linhof-Rapid wire release adapter installed. You can see this adapter in the images below – a black cone with a white ring at the top. This adapter is meant to allow for a quick plugging and un-plugging of the wire release. However, I found out that my wire release shown above does not hold well in the adapter. Hence I will probably get a new one which is fully compatible.


