Venturing into Large Format (Part 3)
On the last 3 weekends I did my first tests with the Tachihara 4×5 camera and the Schneider-Kreuznach Symmar 5,6/150 and the Super-Angulon 5,6/75. As these were mere technical tests, I chose some historical palaces castles and churches which are easily accessible.
In such places open to the public, a photographer with a large format camera quickly becomes the centre of attention of many of the other visitors. You get stared at, people talk to you, ask a lot of questions. I was actually rather shocked how many people in their 30s and 40s seem to have forgotten what photographic film is, apparently never heard of bellows and focussing screen – and hence they cannot imagine that a camera can be so simple and mechanical, without any black box electronic magic.
So, if you ever try shooting large format yourself in public, be prepared to attract a lot of attention. It is sometimes even hard to concentrate on the shooting itself if too many people approach you.
Setting up the camera:
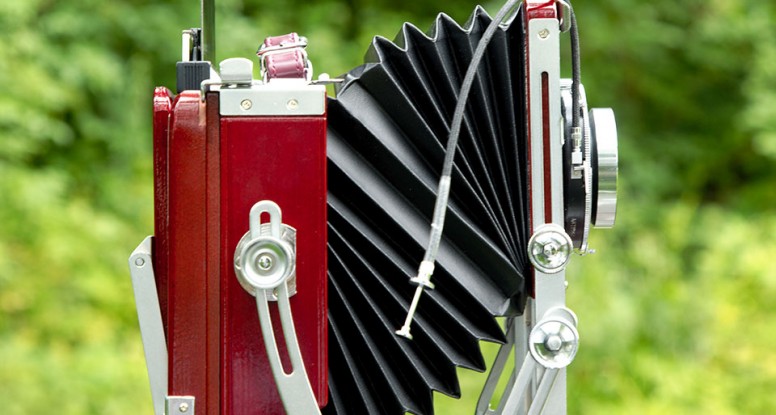
The following series of images show the setting up of the large format field camera: First you attach it to the tripod, unfold it, lock all the knobs tightly but not using real force, attach the lens board which holds shutter and lens, screw in the cable release, and finally you put the dark cloth on the back of the camera.
")
")
")


Composing and focussing:
Before your head gets under the dark cloth, you should open the shutter so you will actually have an image on the focussing screen. Most shutters have a little lever to open the shutter independently from bulb mode. At least at this stage it is also advisable to set the largest possible aperture in order to get a bright image on the screen.
With your head under the dark cloth, you can now compose the image (upside down) on the screen and adjust the camera’s tilt and shift movements (see also Scheimpflug Principle, Wikipedia link). Focussing is best done with a loupe on the screen. Below you can see myself under the dark cloth, focussing, and two of my loupes.


The loupe on the left hand side is made from proper glass at least, and the tube it is stuck in was a bit of DIY by cutting off the hollow handle of some tool.
Exposing the film:
To expose the film, a light meter is of great help. In order to get exposure really as you want it, a spot meter is the best choice as you can use it to measure exactly the darkest and brightest areas of the image, and to measure those areas which are of particular importance/interest. If you own some other camera with a light meter built in, you can of course also use that camera’s light meter. After these measurements are done, you can then set your aperture and shutter speed to the the desired exposure. I will not go into detail here, but if you do not want to purely guess your exposure from those readings, you should have a look at the so called Zone System (Wikipedia link).
If you have not done it yet, you should now close the shutter and cock it. The following images illustrate the next steps: the film holder is inserted behind the focussing screen, the dark slide is pulled away, and finally the shutter is released via the cable and the image is taken! Of course, to protect the film from light, after the image is taken the dark slide has to be inserted back again completely.


Things to go wrong:
A lot of things can go wrong in all this, and believe me, I have made my share of mistakes! The following list gives some typical things which can go wrong easily, but it is by far not complete:
- The sheet film was inserted upside down, with the emulsion layer on the inside of the film holder. This way it will never get really exposed (white negative).
- The dark slide is pulled open when the shutter is still open after the focussing process. This way the film will be totally overexposed (dark negative).
- Acidental multiple exposures on one sheet of film. To avoid this you usually insert the dark slide the other way round after the image is taken. This helps to identify those film holders with already exposed film.
- Another hazard is wind. A large format camera offers a large area for the wind to attack. Hence even with a good and heavy tripod, camera shake can become a problem.
- With wooden cameras with a spring back, pulling out the dark slide too rigorously might cause the spring back to partially open and hence might cause a light leak.
- When extreme shift and tilt movements are used, in particular those of the camera front, then vignetting might occur if the image circle of the lens is to small for the movements. Sometimes, stepping down the aperture can help a bit.
- If you come from a 35mm film background or even from medium format, the first time you shoot large format you will probably underestimate the shallow depth of field. For large format photography f/16 and f/22 are not really small apertures yet. Don’t be shy and try f/32, f/45 and beyond!
But even if you do everything right, things can go wrong as I had to experience on second weekend of test-shooting: After roughly the 20th exposure with my old Symmar, the shutter decided to stay open and to ruin the exposure totally! This was my last sheet of film I had with me on that day so I could not repeat it. Further experimentation with the over 50-years-old Synchro-Compur shutter showed that all the slow speeds below 1/25 would occasionally get stuck. And this seemed to get worse from day to day. Apparently the shutter had not been serviced and cleaned for a long time.
Fortunately, Mr. Reinhardt from Fotomechanik Reinhardt in Germany was able to react quickly and solve my problems. Now the shutter seems to work very reliable.
Below you can see some more extreme shift movement of the Tachihara camera, and two of the first negatives I produced with the Symmar 5,6/150 and the Super-Angulon 5,6/75.


Great article.
My very limited experience worth my Calumet Cambo 4 x 5 helped me to enjoy your article. Thanks for making it as simple and real as it is!
You are most welcome 🙂
As with most things in life it is mostly about doing them, then you will learn.
Enjoy your 4×5!
Hi Alex, this is Roberto, i read your articles with great interest. I also own a TachiHara 4×5 camera but I’m still completing because I have to buy lenses and film holder. As this are quite expensive (considering items in good used conditions) I have to wait to collect enough money…
Now I use my Hassy 500c almost always with tripod, and what you tell about interest of people has been noticed by me too. It’s very funny and I love to give information on the camera and other equipment. I think it’a way to spread knowledge and culture, and knowledge and culture is never enough, wherever you are in the world.
Happy shoting with your Tachihara and hope to share soon some of my shot with you through Pinterest or, also, through photo.net.
Cheers
Had a 1939 Cherry Mahogany Deardorff, found a machinist that made adapters to mount majestic heads on my Bogen 3036, friend in movie industry begged me to sell it to him,he has it still, can go from low to the ground to 8′ in the air and very stable, shooting 8×10 is like adjusting your tv,the ground glass is so big and truly a pleasure, my mentors shot 11×14 Deardorffs! And 12×20 Panoramas, think I would now like a 5×7 and an additional 4×5 back